When the bike won’t run, as everyone can guess, there are potentially two things that could go wrong: there’s no spark or no fuel. (Or perchance there’s no spark AND no fuel simultaneously.) Tough, establishing that there’s no spark is not sufficient to revive the dead patient. We have to dive into the motorcycle electrical system details and analyse it step by step. So let our first step in this journey be the testing of the DR ignition coil :)
Prologue
As you’ve might already noticed from the previous post, Marta bought not running Suzuki DR 350. The bike stood for 2 years in the garage, because of the probable carburetor failure (a previous owner opinion).
The overall bike condition is rather good:
- 33 000 km of mileage
- dry front and rear suspensions
- swingarm and prolink bearings are perfect
- wheel rims are shiny
- the engine and the carburetor are dry and have no damages
- brake discs like new
- brake calipers are clean
- the bike is rather clean even in some nooks, what indicates it wasn’t used for any hard enduro riding
So is it enough to make it run? Not exactly.
The bike lacks battery and the tires are from 2004. Apart from that the chain is like a rag, there are no mirrors and we have some small oil leakage from the rocker cover (a common problem).
We suppose there are more bugs to come on the way, while we will rebuild it. But let’s fix those later and check the ignition coil first :)
Why the ignition coil first?
As we mentioned in the preface to this post, there are two reasons why the bike won’t run – lack of spark or the fuel is not reaching the cylinder.
Naturally, we’ve tested the first hypothesis and after unscrewing the spark plug it turned out that indeed our patient doesn’t get any spark.
We did some research among the DR owners to see what can be the most probable cause of that. The ignition coil failure was the most frequent answer, so we gave it a try in the first place.
The ignition coil testing procedure
The whole procedure of the ignition coil testing is described in the Suzuki DR350S service manual at chapter 5, page 2 and consists of two measurements.
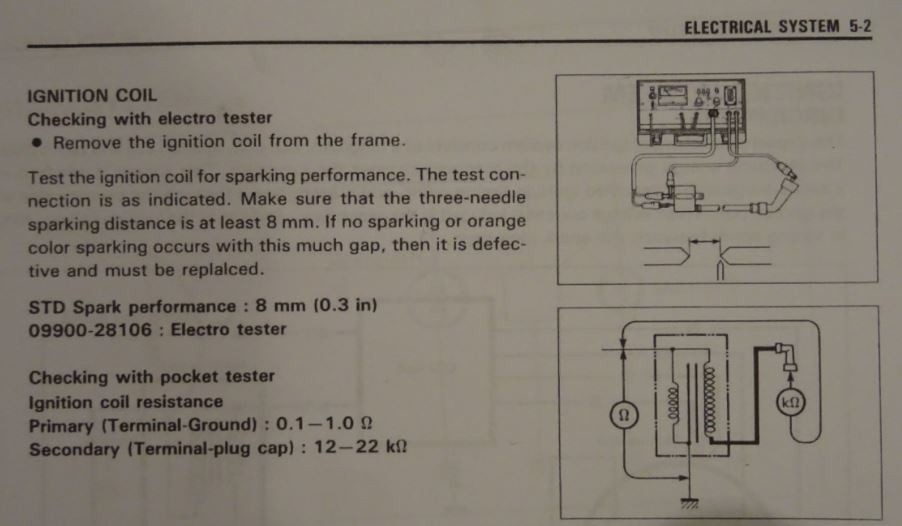
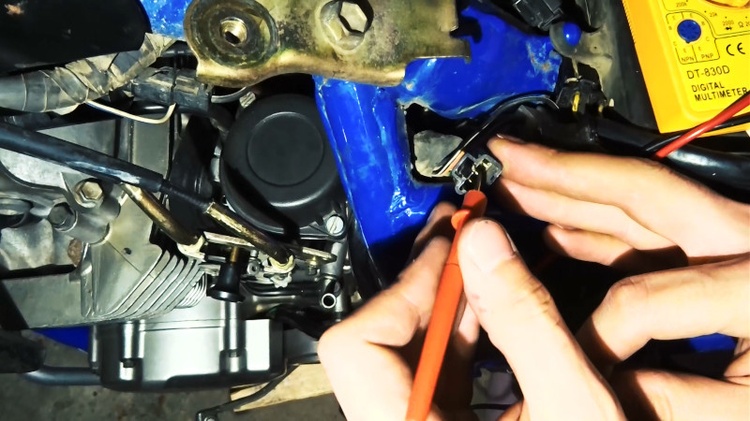
All we have to have is a simple multimeter.
First we check the resistance of the primary winding, so between the coil’s ground (a metal cube, which serves as a coil’s foothold) and the coil’s terminal (a flat metal connector, where the plug is attached). The measurement here should be between 0.1 and 1 Ω.
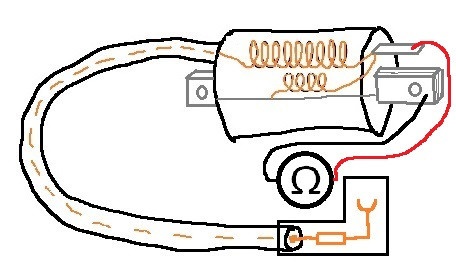
Next we have to check the secondary winding, which generates the high voltage. To do so, we pin up the multimeter between the coil’s terminal (as before) and the contact inside the spark plug cap. The result should fit into the range of 12 – 22 kΩ.
Troubleshooting the ignition coil secondary winding fail
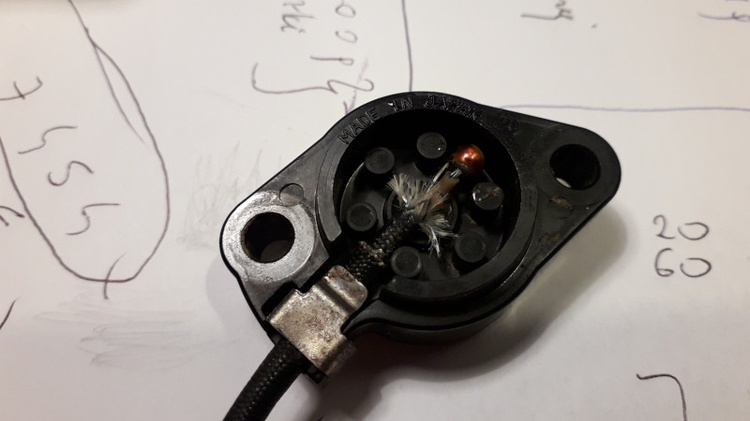
In case of Marta’s DR, the second measurement revealed that’s something wrong and there’s no connection between the coil’s terminal and the spark plug cap. But the spark plug cap was very weakly holding on to the cable. A little tug and it was coming off. This let us to narrow down the suspects.
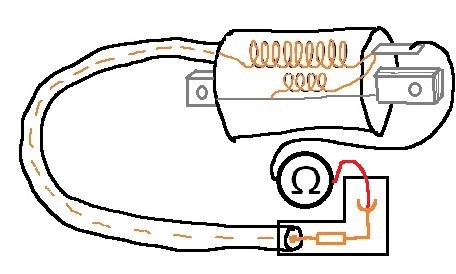
We ran a second round of test. Tough, we modified a little the secondary winding test – this time we pinned up the multimeter not to the spark plug cap, but inside the high voltage cable. The measurement was 6.5 kΩ.
After that we tested the spark plug cap alone – between it’s spark plug contact and the threaded screw, which goes into the high voltage cable and… bingo, there was our lack of connection.
It turned out that inside the spark plug cap we have a resistor (╯°□°)╯︵ ┻━┻
We didn’t know what resistor was it. But the secondary winding alone has resistance of 6.5 kΩ and is connected with the resistor in the spark plug cap in series, so we just sum up both resistances to get 12 – 22 kΩ from the service manual in total.
We bought a Swiss spark plug cap with 5 kΩ, so we’ve got 11.5 kΩ in total. So almost in the desired 12-22 kΩ range, but it should suffice anyway.
You can watch the testing procedure here:
The spark plug replacement
As we found the culprit, who apparently just died somehow and wouldn’t cooperate with the ignition coil any longer, we replaced it.
It’s not a hard procedure, but it would be nice to do it properly – once and for all ;)
We take off the old spark plug cap and all of its rubber sealings. There should be two: one between the spark plug cap and the spark plug and second – between the spark plug cap and the high voltage cable.
Before we put on the new cap, first we cut a little the high voltage cable with some rotary tool. It’s better not to use any ordinary cutters here as we don’t want to muss up neither a rubber nor a copper core of the cable.
When we have a cut cable, we have to dig some space in the high voltage cable for the spark plug cap terminal. So we put a needle inside in the center of the cable and push a little to the sides. When the hole gets bigger – we change the needle to some bigger tool. And when the bigger tool will seem to small – we again change it to even bigger stuff ;) We ended the hole making procedure on a 1.5 mm hex key.
When the hole is ready, we put the sealing on the high voltage cable. If you forget you will have to unscrew the cap again :/
Then we can put in the new spark plug cap, aiming the conical screw inside the high voltage cable. And then we can screw it quite firmly. Though, in the normal cable setup, the spark plug cap should point at the engine, not at the sky ;) And we’re done! :)
If you need visualization, though, look here:
Summary
The spark plug cap cost us about 3$.
Did it help?
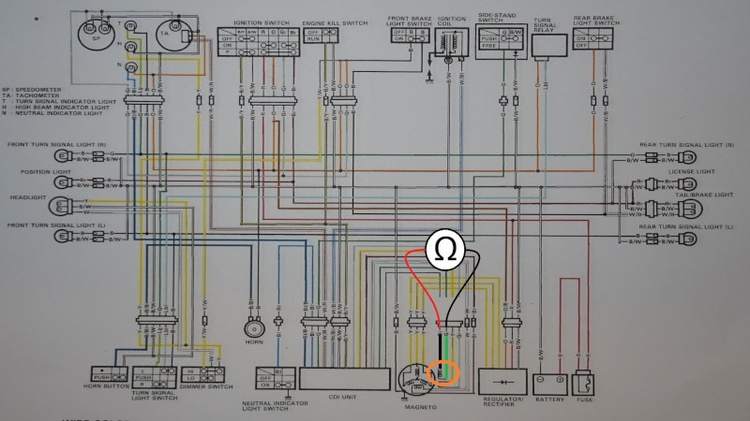
No, actually :D But we had to find this issue sooner or later, I guess ;) Though, something was still missing, no doubt. We will dive deeper in the DR electrical system and check the power source coil, the pick up coils, the kill switch, the ignition switch, the neutral switch and the CDI unit.
Comments